
Want to see a caterpillar become a moth or a butterfly? Build a bug cage, find a caterpillar to babysit and watch the process first hand!
 Caterpillars are nice, quiet little animals to watch. They’re not smelly, they don’t make much noise, and they’re easy and cheap to feed. Watch long enough, and you may see the caterpillar spin a cocoon. Will it emerge as a moth or a butterfly? To find out, you’ll have to keep the cocoon outdoors in a safe place until metamorphosis (changing from one form to another) is complete.
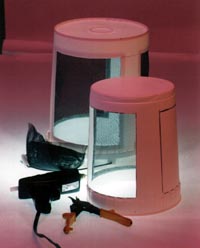
To keep your cocoon safe, you really need some kind of cage. Glass jars don’t work very well: they get wet and smelly inside, and they can break. But with a little work and some help from a responsible adult, you can make the very best bug cage.
Before you put any captured animal in a cage, you must promise to look after it—every day if you have to. Keep this promise to the animal. Otherwise, let it go where you found it.

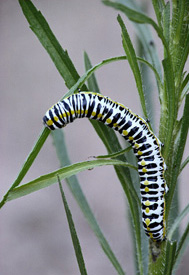
With caterpillars, you can use this cage upside-down so the bucket-lid is the base. First, watch the caterpillar in the wild to see what kind of leaves it eats. Then only feed it fresh leaves of that kind. Caterpillars eat a lot and should have fresh leaves and a clean cage at all times. Put about six leafy twigs in a small jar partly filled with water. Put crumpled paper around the twigs to keep the caterpillar from falling in the water.
Once the caterpillar starts to spin its cocoon, watch, but don’t touch: vibration will upset it. When the cocoon appears finished, you can do some housekeeping: pour out the water, throw away the extra leafy twigs, and let the twig with the cocoon dry out. Some caterpillars will insist on spinning their cocoon on the cage walls or windows, but that’s okay.
At this point, you should move the cage to a dry, safe, sheltered outdoor place. Dry is important, so is the normal outdoor temperature. Otherwise, your moth or butterfly might hatch much too soon, before there are any flowers with nectar on which to feed.
Look into the cage every day to see if anything has emerged. Trying to wait and watch long enough to see the actual emergence of the insect will test your patience. It will be worth it, however, when you get to release your beautiful moth or butterfly into the spring sunshine.
Bug Cage Materials
 An 11.4-liter ice cream pail or 20-liter bulk food bucket (Some restaurants and ice cream parlors will give these to you for free)
- A piece of black plastic window screen––wide and tall enough to go around the bucket (You can buy this at a hardware store)
- Dark-colored crayon
- Ruler
- Heavy-duty utility knife or metal shears
- Glue gun
- Fine sandpaper
- Scissors
Instructions
Safety Tip: Ask an adult to cut the plastic for you and to help with the glue gun.
Note: This project works with a variety of bucket sizes. Because measurements will vary depending on the size of the bucket you use, we have given approximate measurements which you can use as a guide.
- Wash the bucket outside with soap and water and leave it upside-down to dry.
- Use a crayon to draw two lines around the outside of the bucket: one about 5 cm from the top and one about 5 cm from the bottom of the bucket. If the bucket has a wide rim, draw your top line below the rim—this will make cutting the plastic easier.
- Draw 3 rectangles on the bucket. The rectangles should be about 8 cm wide and run from the top line you drew to the bottom line you drew. The rectangles should be evenly spaced around the bucket.
- Lightly color in the 3 rectangles with the crayon—these are the areas you will NOT cut.
- Have an adult use metal shears or a heavy-duty utility knife to cut out the 3 boxes that are uncolored—these are the windows. This step may be a little difficult as the plastic is hard and slippery.
- Use a piece of fine sandpaper to “rough up” the plastic around the windows on the inside. This will help the glue stick better.
- Cut three pieces of window screen to a size slightly larger than that of the windows.
- Put a piece of screen in one of the windows from the inside.
- Use a glue gun to glue the screen to the bucket. Start by putting a dab of glue at both the top and bottom of the screen to hold it in place then work your way outward in both directions. Glue the vertical sides last.
- Repeat Steps 8 and 9 for the remaining two windows.